
Section 508 of the Rehabilitation Act of 1973, § 1194.24(c) states that “All training and informational video and multimedia productions which support the agency’s mission, regardless of format, that contain speech or other audio information necessary for the comprehension of the content, shall be open or closed captioned.” This accommodation ensures that students with hearing impairments are able to read textual versions of any audio content in a format that is synchronized with the video content.
Ensuring that all of our courses remain accessible to all of our students, regardless of disability, remains a top priority at FIU Online. There are specific steps you can take to ensure that all your courses are accessible. This area covers how to meet ADA compliance requirements for online courses, including creating screen reader-friendly documents, publishing captioned videos, and adaptively releasing extended-time assessments in Canvas. Please visit the Canvas General Accessibility Guidelines for step-by-step tutorials on creating accessible content within the LMS.
Accessibility FAQs
-
Web-Delivered Content
The ADA recommends the following best practices when creating web-delivered content:
- Minimize blinking, flashing, or other distracting feature
- If they must be included, ensure that moving, blinking, or auto-updating objects or pages may be paused or stopped
- Include visual notifications and transcripts if sounds automatically play
- Use titles, context, and other heading structures to help users navigate complex pages or elements (such as PowerPoints that use title and subtitle boxes)
- Ensure that images have alt text specified, which allows screen readers to replace the image with descriptive text
The Accessibility Checker makes it easier than ever to improve the accessibility of your content pages within Canvas.
-
Alt Text with Types of Images
Vision-impaired individuals and people with other disabilities that affect their ability to read a computer display often use different technologies so they can access the information displayed on a webpage. Two commonly used technologies are screen readers and refreshable Braille displays.
- A screen reader is a computer program that speaks the text that appears on the computer display, beginning in the top-left corner.
- A refreshable Braille display is an electronic device that translates text into Braille characters that can be read by touch.
These assistive technologies read text. They cannot translate images into speech or Braille, even if words appear in the images. For example, these technologies cannot interpret a photograph of a stop sign, even if the word “stop” appears in the image.
Because they only read text, screen readers and refreshable Braille displays cannot interpret photographs, charts, color-coded information, or other graphic elements on a webpage. For this reason, a photograph on a website is inaccessible to people who use these assistive technologies, and a vision-impaired individual visiting the website would be unable to tell if the image is a photo, a logo, a map, a chart, artwork, a link to another page, or even a blank page.
What is an Alt Tag?
The term “ALT tag” is a common shorthand term used to refer to the ALT attribute within the IMG tag. Any time you use an image, be sure to include an ALT tag or ALT text within the IMG tag. Doing so will provide a clear text alternative to the image for screen reader users. The ALT tag adds a text description to an image on a Web page, and should be used for all images, graphical bullets, and graphical horizontal rules. The alt text within the ALT tag should let the user know what an image’s content and purpose are.
Alt Tag Best Practices
- Should not exceed 150 characters
- Refrain from using the words “photo” or “image”
- All decorative images should be bypassed by screen readers
Types of Images and Proper Alt Tags
Decorative Images: don’t add information to the content of a page. (borders, spacers, eye candy images, etc.) Sample Decorative Image:

Proper Alt Tag: Null
Best Practice: All decorative images should be bypassed by screen readers
Functional Images: are used to initiate actions rather than to convey information. They are used in buttons, links, and other interactive elements. (printer icons, navigation icons, etc.) Sample Functional Image:

Proper Alt Tag: Downloadable PDF Document
Informative Images: convey a simple concept or information that can be expressed in a short phrase or sentence. (person or groups of people, animals, items, etc. Sample Informative Image:

Proper Alt Tag: Female student typing on her computer, while surrounded by books.
Complex Images: contain substantial information – more than can be conveyed in a short phrase or sentence. (graphs, Illustrations, Maps, etc.)
Sample Complex Image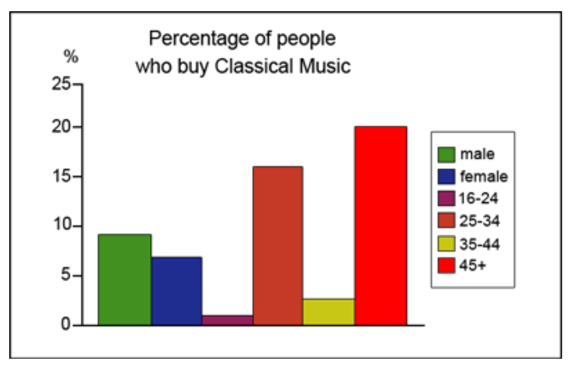
Proper Alt Tag: Bar graph illustrating the percentage of people who buy classical music. The results indicate that males (ages 45 and older) are most likely to buy classical music.
How to add Alt tags in Canvas
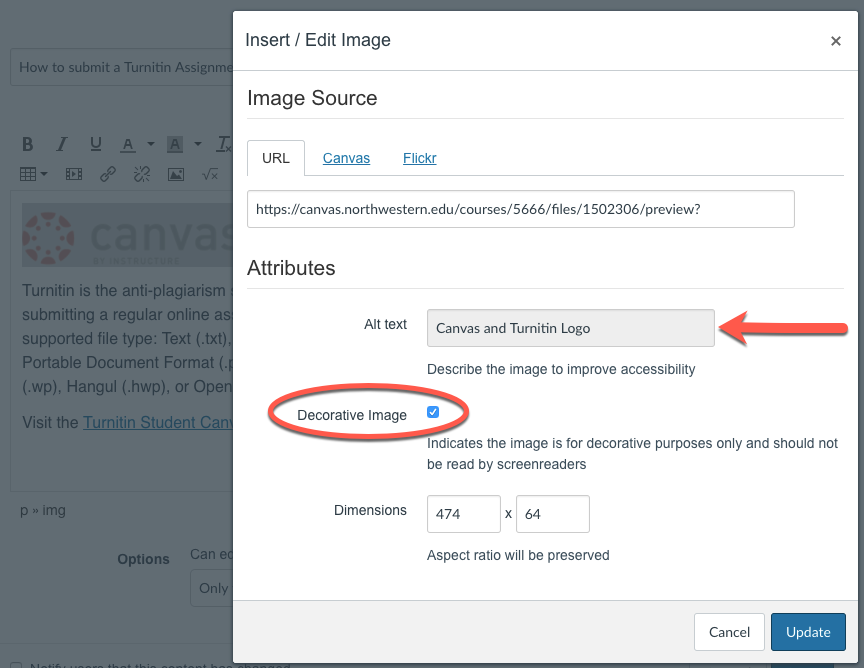
To add alt text to an image in Canvas, include a label in the field called “Alt Text”:
NOTE: Make sure to identify if the image is for decorative purposes only by checking the “Decorative Image” box accordingly. All decorative images will be bypassed by screen readers.
-
Headings in Canvas
When creating pages in Canvas it’s important to incorporate headings where appropriate. Headings help in defining the hierarchy and structure of the web page. HTML uses six levels of heading tags <h1> to <h6>; the higher the heading level number, the greater its importance — so <h1> defines the most important heading, whereas the <h6>defines the least important heading in the document.
Headings Best Practices
- HTML headings provide valuable information by highlighting important topics and the structure of the document.
- Don’t use headings to make text BIG or bold. Use it only for highlighting the heading of your document and to show the document structure.
- Search engines use headings to index the structure and content of your web pages so use them very wisely in your webpage.
- Use <h1> headings as main headings, followed by <h2> headings, then the less important <h3> headings, and so on.
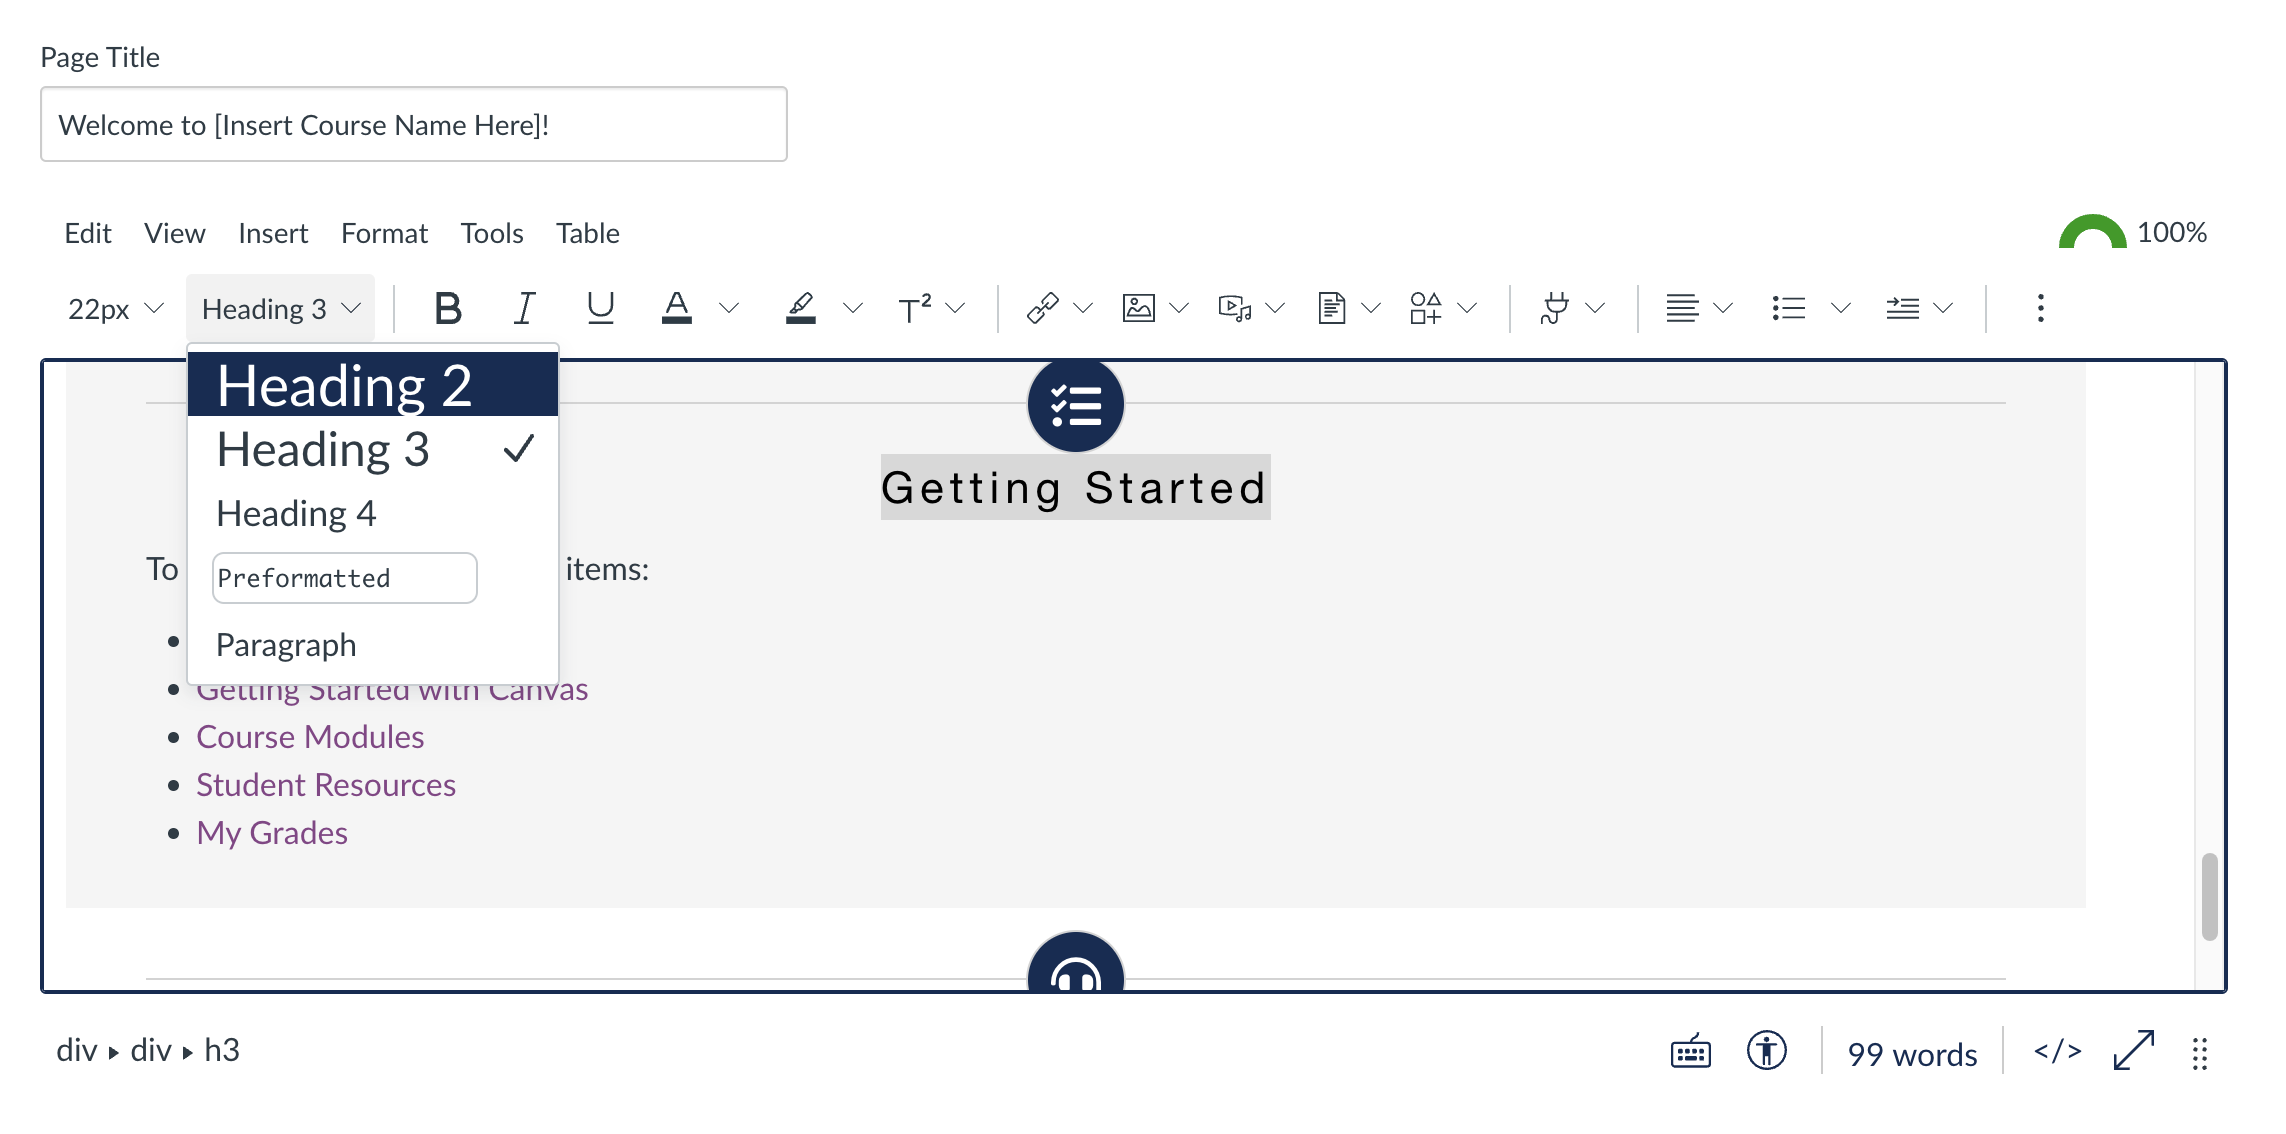
The page title in Canvas defaults to Heading 1, so any section heading in Canvas will begin with Heading 2.
Adding Headings in Canvas
To add headings, access the rich text editor, highlight the line of text you wish to edit, then select the appropriate heading.
-
Colors and Fonts
Web Page designers often have aesthetic preferences and may want everyone to see their webpages in exactly the same color, size and layout. But because of their disability, many people with low vision do not see web pages the same as other people do. Some see only small portions of a computer display at one time. Others cannot see text or images that are too small. Still, others can only see website content if it appears in specific colors. For these reasons, many people with low vision use specific color and font settings when they access the Internet – settings that are often very different from those most people use. For example, many people with low vision need to use high-contrast settings, such as bold white or yellow letters on a black background. Others need just the opposite – bold black text on a white or yellow background. And, many must use softer, more subtle color combinations.
List of Recommended Fonts
Highly Recommended | These fonts are highly recommended for legibility:
- Verdana
- Georgia
- Lucida Grande (Mac)/Lucida Sans (Win)
Reasonably Accessible | These fonts are also legible in many dimensions:
- Helvetica/Arial
- Tahoma
- Trebuchet
- Candara
- Century Gothic
- Bookman Old Style
- Palatino/Book Antique
- Comic Sans
For Headers Only | These fonts should be used sparingly in headers and decorative text:
- Arial Black
- Arial Narrow
- Impact
- Harrington
- Monotype Corsiva
- Any stylized font
Text Best Practices:
- Font size should be 12
- San Serif Fonts should be used for easy readability
- The use of all CAPS for large blocks of text should be avoided
- Avoid the use of underlined text, as screen readers can mistake underlined text for navigation links
- Bold should only be used to emphasize important information
- The combination of bold and italics should be avoided. Use one or the other, not both
List of Recommended Color Ratios:
The WCAG 2.0 guideline 1.4.3 recommends the following luminosity ratio standard of 1 to 4.5 for main text and 1 to 3 for large-scale text (18 points+, or 14 points+ bold). NOTE: If your target audience is mostly low vision, then a ratio of 1 to 7 is recommended. If you choose to use color, utilize the WebAIM Color Contrast Checker to ensure adequate color contrast and accessibility-friendly colors. The following are examples of Rich Content Editor Colors Contrast Ratios within Canvas:
Highly Recommended (Over 7)
- Burnt Orange: 7.43:1
- Very Dark Gray: Very Dark Gray: 12.63:1
- Black text: 21:1
Reasonably Accessible (4.5 to 7)
- Blue Text: 4.68:1
- Dark Green: 5.14:1
- Purple Text: 6.95:1
Not Recommended (under 4.5)
- Yellow Text: 1.07:1
- Pale Green Text: 1.12:1
- Orange Text: 2.14:1
- Pink Text: 3.14:1
- Red Text: 4:1
Color Best Practices
- Don’t use color to convey meaning
- Use sufficient color contrast
-
Lists
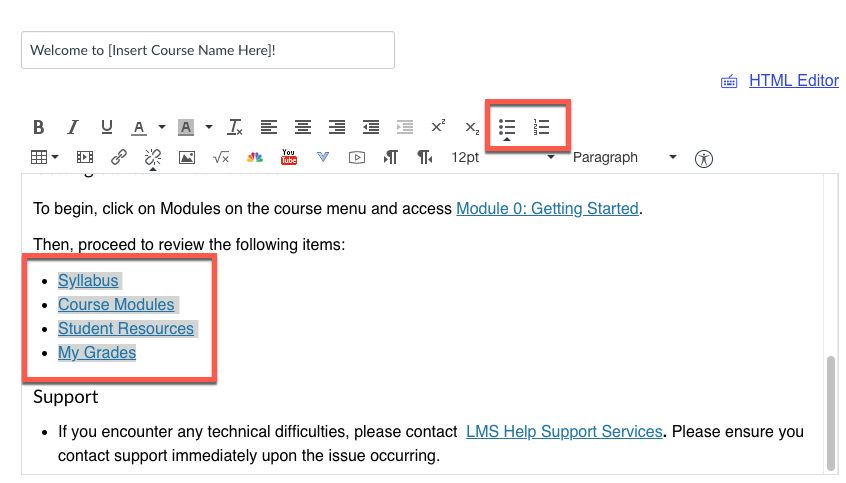
Lists need to be formatted using the list tool within Canvas (within your external documents as well). When a list is formatted using the list tool in the Canvas HTML editor, screen reader will identify that there is a list of X number of items. If the text is not formatted using this tool, a screen reader will read it as if it were sentences on a page and the context will not be conveyed to the student.
To format text using the list’s tools:
- Within the HTML editor, select the content you wish to put into a list
- Select “Bullet List” if the order of the items does not matter or select “Numbered List” if the items have to be in a specific order.
-
Tables
When creating tables, simplicity is key. As best practice, make sure to:
- Avoid merging and/or splitting cells
- Identify a header row.
- Include a title
- Check the table’s reading order
- Screen readers read tables from left to right, top to bottom, one cell at a time. If cells are split or merged, the reading order can be thrown off. To check your table’s reading order, Place your Cursor On the First Cell → Press the Tab Key on your Keyboard → Cursor Should Move from Left to Right, Top to Bottom.
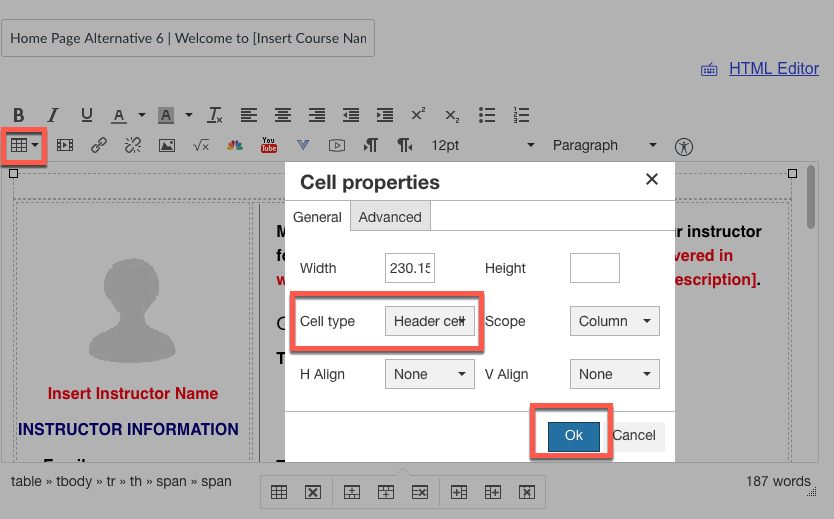
Designating column headers in a table is essential to screen reader users understanding how the information is laid out.
- Put your cursor in one of the cells you want to mark up as a table header.
- Then click on the drop-down menu next to the Table icon in the toolbar.
- Choose Cell → Cell Properties. The Cell properties window will pop up.
- In the Cell type field, click on the drop-down list and select Column Header.
- Click ok. You will know you have successfully changed the row to table headers because the look of the table cells will change.
- Repeat for each cell that is a column header.
Learn more on how to create tables within Canvas and then run the accessibility checker in Canvas.
-
Hyperlinks
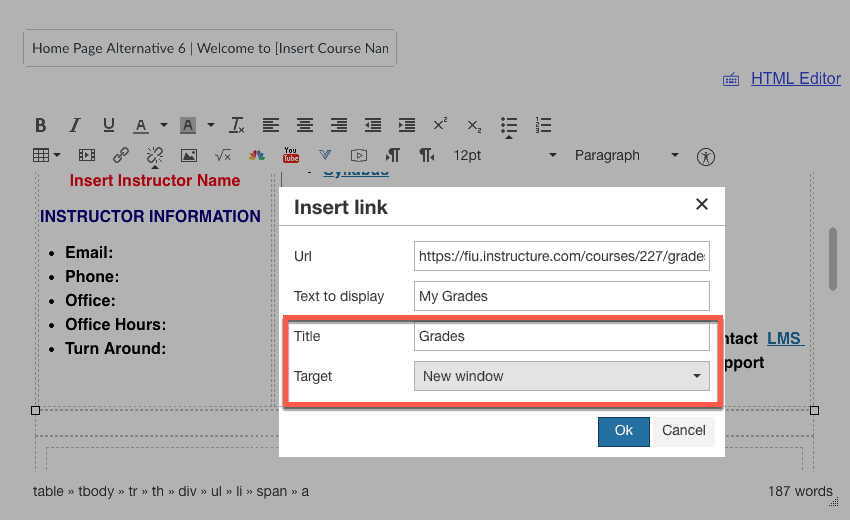
Links are a major navigational component for all users. When creating hyperlinks:
- Replace long URLs with meaningful, context-specific text.
- “Click here” or “Read more” should not be used within text.
- Hyperlinks should have titles.
- ALT text is not required for hyperlinks.
- All links should be set to open in a new window.
Learn more about Creating a new Hyperlink with Canvas. Once the hyperlink has been created, you’ll need to add a title and set it to open in a new browser window:
- Select the hyperlink you wish to edit
- Click “Command + K” (Mac) or “Ctrl + K” (PC) to open up the edit window
- Enter hyperlink title
- Set “Target” to “New Window”
- Click “Ok”
- Click “Save”
-
Equations (Math and Science)
In the Rich Content Editor, you will find an Insert Math Equation icon (Pi icon). Clicking on the icon opens the Math Equation dialog box to create your equations.
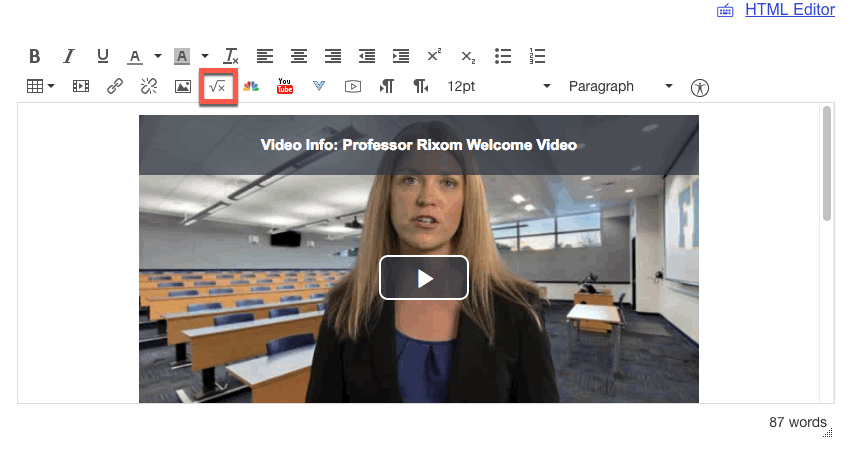
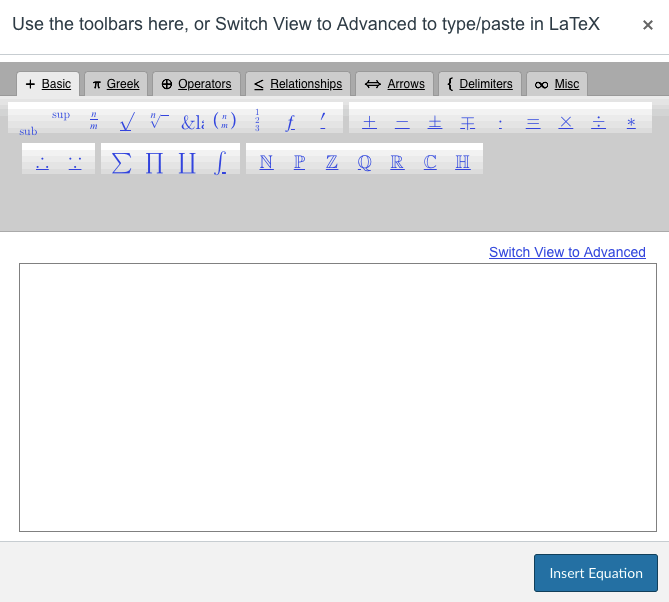
Canvas will render the equation as an image with the correct LaTex code provided as alternative text. This is fully accessible to the screen reader user. See the “How do I use the Math Editor in the Rich Content Editor?” Canvas guide for more information on using the Math
Chris Hughes Scot Leavitt with Portland Community College has done extensive research on accessibility for STEM courses. For notes and best practices derived from his research on Accessible Content Creation in Mathematics, visit PCC’s Math and Science Accessibility instructional support page.
-
Document Accessibility
Websites and online services will often post documents on their websites using Portable Document Format (PDF). However, PDF documents, or those in other image-based formats, are sometimes not accessible to blind people who use screen readers and people with low vision who use text enlargement programs or different color and font settings to read computer displays. This is especially common when the document is a scan of a printed page. Luckily, optical character recognition technologies can often be employed, allowing the text to be extracted from such documents. This permits screen-readers to read this text.
Visit the OCR Steps page for instructions on how to apply OCR to PDF documents.
- Word: Make your documents accessible
- Powerpoint: Make your presentations accessible
- Excel: Make your spreadsheets accessible
- PDF: Create and verify accessibility
- PDF: Saving as accessible PDF
- Google: Make your document or presentation accessible
- Windows Accessibility Checker
- Mac Accessibility Checker
- Grackle | Google Docs Accessibility Checker
-
Videos and Other Multimedia
Due to increasing bandwidth and connection speeds, videos and other multimedia are becoming more common across the internet, including in online courses.
Most types of multimedia can present two distinct problems for people with different disabilities. People who are deaf or hard of hearing can generally see the information presented on webpages. But a deaf person or someone who is hard of hearing may not be able to hear the audio track of a video. On the other hand, persons who are blind or have low vision are frequently unable to see the video images but can hear the audio track.
The most common accommodation for multimedia is to provide transcripts or other textual equivalents for any multimedia components in online courses.
It is FIU Online’s best practice to always provide transcripts or close captions for all videos and audio components in courses. Faculty members should be encouraged to provide transcripts whenever possible.
Youtube Videos
To search for videos captioned by a human and not auto-generated, follow this easy search technique.
- Enter your search term (for this example, let’s say I’m searching for videos on volcanoes) in the YouTube search field.
- Add a: , CC (that’s a comma, CC)
- Hit Enter or click the magnifying glass icon.

To determine if a YouTube video has auto-generated captions (consider these as un-captioned) or captions done by a human (much preferred),
- Click on the Settings button in the bottom right corner of the video player.
- Choose Subtitles/CC
Make sure there is an English option and not just an English (auto-generated) option.
Zoom Meetings
If you have a student registered with the Disability Resource Center who requires captioning in an online (synchronous) meeting, make arrangements for a captioner by contacting the DRC directly or your instructional designer.
Tips for a successful meeting:
- Review Getting Started with Zoom
- Set up a practice session to reduce technical difficulties during your live sessions.
- If applicable, elevate the transcriber’s room access to moderator to ensure they are able to assist the student(s) in question.
- If applicable, restate math or science problems/equations by typing them onto the whiteboard before completing the problem.
- Always make sure to record your sessions
-
Best Practices when Encountering Students who need Extended Exam times
What is extended exam time?
Extended assessment time is a type of accommodation granted to students with timing or scheduling disabilities. This includes students with various cognitive, physical, and behavioral disabilities. An extended time assessment is no different than a regular time exam except that students with accommodations are allowed extra time to complete the exam (i.e. “double-time” or “time and a half”).
- Coombs, N. (2010). Supporting Accessible Online Learning. Making Online Teaching Accessible: Inclusive Course Design for Students with Disabilities (p. 122, point #4). San Francisco: Jossey-Bass Guides
- Coombs, N. (2010). Creating a Level Learning Space. Making Online Teaching Accessible: Inclusive Course Design for Students with Disabilities (p. 12, Title II of the Americans with Disabilities Act). San Francisco: Jossey-Bass Guides
Extended Exam Time is the most frequently requested DRC accommodation. All extended-time requests must be processed through the FIU Disability Resource Center. Additionally, if the DRC does not contact the Instructional Designer for an accommodation, the course instructor is responsible for communicating with the ID which student(s) and which assessment(s) require extended time.
Creating Extended Exam Times in Canvas with Quizzes
- In the course navigation, click the “Quizzes” link
- Click on the name of the quiz you wish to modify
- Click the “Moderate This Quiz” link
- Locate the student, per the DRC accommodation letter, you will be moderating the quiz for
-
- Note: You can select multiple students per quiz by selecting the check box next to their name. This should only be done if these students have the same time extension accommodation.
- For one student, select the edit button (pencil icon) on the far right side of the page OR for multiple students, click on the “Change Extensions for “X” Selected Students” towards the bottom of the page.
- In the student extensions window enter the student’s accommodation accordingly:
-
- Extra Attempts – If applicable
- Extra time on every attempt – enter the time extension in minutes. For example, if the quiz is 60 minutes and the student's accommodation is “double the time, 2x”, you will put “60” minutes in the time box not “120” minutes. It’s important that you do not enter the total time allowed in this checkbox as it will add it to the quiz’s existing time window.
- Click Save
Note: These steps need to be repeated for every DRC student for every assessment in the course.
Creating Extended Exam Times in Canvas with Quizzes LTI (BETA)
- In the course navigation, click the “Assignments” link
- Click on the name of the Quiz that is using the Quizzes LTI (BETA) tool
- Click on the “Moderate” tab
- Locate the student, per the DRC accommodation letter, you will be moderating quizzes for by selecting the “moderate” on the far-right side of the page
- To adjust the timer settings for the student, click the “Adjust Timer Settings” checkbox
- As best practice, select the “Time Limit Multiplier” button and enter the student’s accommodation accordingly. For example, enter “1.5” for time and a half, enter “2” for double the time, etc.
- Click Save
Note: These settings will be applied to all course assessments for the selected student(s) in the aforementioned steps.
Review the Canvas Guides of “ How can I give my students extra time” for additional information.
-
External Content
One of the biggest issues is the use of outside sites for required content. The vast majority of commercial and educational sites are not compliant with accessibility laws. Linking to a non-compliant site and making it a requirement for the students to go there can cause a problem with passing an accessibility review.
Strategies for Using External Sites
- If at all possible, make external sites optional material and clearly state that the material is optional where you link to it.
- If some of the content on an external site is required, write text to cover the content required, put it on your site, and then make the external link optional.
- Guidelines for Adopting Publisher Content – Portland Community College
How to test sites using WAVE
If you are linking to external sites, you may want to test them yourself. This can easily be done by going to the WAVE site and inputting the URL of the site to test. WAVE is a tool developed by WebAIM that is available both online and as a Firefox add-on. It reports accessibility violations by annotating a copy of the page that was evaluated and at the same time, providing recommendations on how to repair them. Rather than providing a complex technical report, WAVE shows the original Web page with embedded icons and indicators that reveal the accessibility information within your page.
After running the test, there will be a yellow bar at the top of the page that will alert you if there are any accessibility errors. The page will have a number of icons appear. Red icons show where there are accessibility errors. Green icons show where there are elements that pass 508 compliance standards. Yellow icons point out items that should be looked at more closely to determine compliance.
-
Resources
The following handbooks serve as additional resources for accessibility best practices for course design:
- Web Accessibility Guidelines
- Shared Responsibilities Document
- Complex Images for All Learners Handbook
- Accessibility QuickGuide
- QM Connect
These handbooks were used and modified under a Creative Commons License (Licensed under CC BY-NC-SA 4.0). Content provided by Portland Community College.